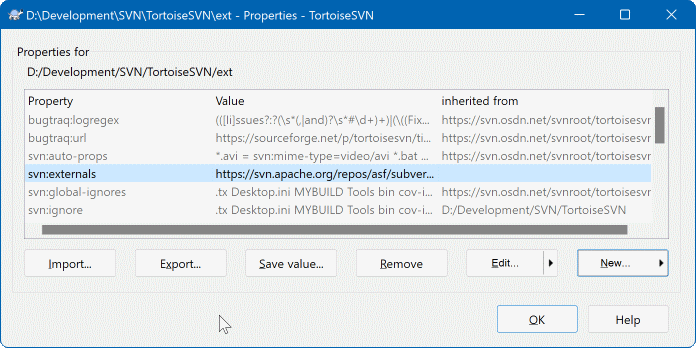
You can read and set the Subversion properties
from the Windows properties dialog, but also from
→
and within TortoiseSVN's status lists, from
→ .
You can add your own properties, or some properties with a
special meaning in Subversion. These begin with svn:.
svn:externals is such a property; see how to handle
externals in the section called “External Items”.
Subversion supports CVS-like keyword expansion which can be used to embed filename and revision information within the file itself. Keywords currently supported are:
- $Date$
Date of last known commit. This is based on information obtained when you update your working copy. It does not check the repository to find more recent changes.
- $Revision$
Revision of last known commit.
- $Author$
Author who made the last known commit.
- $HeadURL$
The full URL of this file in the repository.
- $Id$
A compressed combination of the previous four keywords.
To find out how to use these keywords, look at the svn:keywords section in the Subversion book, which gives a full description of these keywords and how to enable and use them.
For more information about properties in Subversion see the Special Properties .
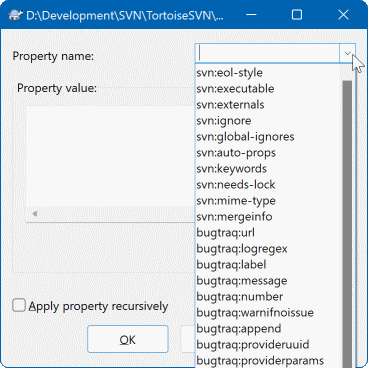
To add a new property, first click on New....
Select the required property name from the menu, and then
fill in the required information in the specific property
dialog. These specific property dialogs are described in more
detail in the section called “Property Editors”.
To add a property that doesn't have its own dialog, choose from the New... menu. Then either select an existing property in the combo box or enter a custom property name.
If you want to apply a property to many items at once, select the files/folders in explorer, then select → .
If you want to apply the property to every file and folder in the hierarchy below the current folder, check the Recursive checkbox.
If you wish to edit an existing property, select that property from the list of existing properties, then click on .
If you wish to remove an existing property, select that property from the list of existing properties, then click on .
The svn:externals property can be used to
pull in other projects from the same repository or a completely
different repository. For more information, read
the section called “External Items”.
Edit properties at HEAD revision
Because properties are versioned, you cannot edit the properties of previous revisions. If you look at properties from the log dialog, or from a non-HEAD revision in the repository browser, you will see a list of properties and values, but no edit controls.
Often you will find yourself applying the same set of properties many
times, for example bugtraq:logregex. To simplify
the process of copying properties from one project to another, you
can use the Export/Import feature.
From the file or folder where the properties are already set, use → , select the properties you wish to export and click on . You will be prompted for a filename where the property names and values will be saved.
From the folder(s) where you wish to apply these properties, use → and click on . You will be prompted for a filename to import from, so navigate to the place you saved the export file previously and select it. The properties will be added to the folders non-recursively.
If you want to add properties to a tree recursively, follow the steps above, then in the property dialog select each property in turn, click on , check the Apply property recursively box and click on .
The Import file format is binary and proprietary to TortoiseSVN. Its only purpose is to transfer properties using Import and Export, so there is no need to edit these files.
TortoiseSVN can handle binary property values using files. To read a binary property value, to a file. To set a binary value, use a hex editor or other appropriate tool to create a file with the content you require, then from that file.
Although binary properties are not often used, they can be useful in some applications. For example if you are storing huge graphics files, or if the application used to load the file is huge, you might want to store a thumbnail as a property so you can obtain a preview quickly.
You can configure Subversion and TortoiseSVN to set properties automatically on files and folders when they are added to the repository. There are two ways of doing this.
You can edit the Subversion configuration file to enable
this feature on your client. The General
page of TortoiseSVN's settings dialog has an edit button to
take you there directly.
The config file is a simple text file which controls some of
Subversion's workings. You need to change two things:
firstly in the section headed
miscellany uncomment the line
enable-auto-props = yes.
Secondly you need to edit the section below to define which
properties you want added to which file types.
This method is a standard Subversion feature and works with
any Subversion client. However it has to be defined on each
client individually - there is no way to propagate these settings
from the repository.
An alternative method is to set the tsvn:autoprops
property on folders, as described in the next section. This method
only works for TortoiseSVN clients, but it does get propagated
to all working copies on update.
As of Subversion 1.8, you can also set the property
svn:auto-props on the root folder. The property value
is automatically inherited by all child items.
Whichever method you choose, you should note that auto-props are only applied to files at the time they are added to the working copy. Auto-props will never change the properties of files which are already versioned.
If you want to be absolutely sure that new files have the correct properties applied, you should set up a repository pre-commit hook to reject commits where the required properties are not set.
Commit properties
Subversion properties are versioned. After you change or add a property you have to commit your changes.
Conflicts on properties
If there's a conflict on committing the changes, because another
user has changed the same property, Subversion generates a
.prej file. Delete this file after you
have resolved the conflict.
TortoiseSVN has a few special properties of its own, and these begin
with tsvn:.
tsvn:logminsizesets the minimum length of a log message for a commit. If you enter a shorter message than specified here, the commit is disabled. This feature is very useful for reminding you to supply a proper descriptive message for every commit. If this property is not set, or the value is zero, empty log messages are allowed.tsvn:lockmsgminsizesets the minimum length of a lock message. If you enter a shorter message than specified here, the lock is disabled. This feature is very useful for reminding you to supply a proper descriptive message for every lock you get. If this property is not set, or the value is zero, empty lock messages are allowed.tsvn:logwidthmarkeris used with projects which require log messages to be formatted with some maximum width (typically 80 characters) before a line break. Setting this property to a non-zero will do 2 things in the log message entry dialog: it places a marker to indicate the maximum width, and it disables word wrap in the display, so that you can see whether the text you entered is too long. Note: this feature will only work correctly if you have a fixed-width font selected for log messages.tsvn:logtemplateis used with projects which have rules about log message formatting. The property holds a multi-line text string which will be inserted in the commit message box when you start a commit. You can then edit it to include the required information. Note: if you are also usingtsvn:logminsize, be sure to set the length longer than the template or you will lose the protection mechanism.There are also action specific templates which you can use instead of
tsvn:logtemplate. The action specific templates are used if set, buttsvn:logtemplatewill be used if no action specific template is set.The action specific templates are:
tsvn:logtemplatecommitis used for all commits from a working copy.tsvn:logtemplatebranchis used when you create a branch/tag, or when you copy files or folders directly in the repository browser.tsvn:logtemplateimportis used for imports.tsvn:logtemplatedeleteis used when deleting items directly in the repository browser.tsvn:logtemplatemoveis used when renaming or moving items in the repository browser.tsvn:logtemplatemkdiris used when creating directories in the repository browser.tsvn:logtemplatepropsetis used when modifying properties in the repository browser.tsvn:logtemplatelockis used when getting a lock.
Subversion allows you to set “autoprops” which will be applied to newly added or imported files, based on the file extension. This depends on every client having set appropriate autoprops in their Subversion configuration file.
tsvn:autopropscan be set on folders and these will be merged with the user's local autoprops when importing or adding files. The format is the same as for Subversion autoprops, e.g.*.sh = svn:eol-style=native;svn:executablesets two properties on files with the.shextension.If there is a conflict between the local autoprops and
tsvn:autoprops, the project settings take precedence because they are specific to that project.As of Subversion 1.8, you should use the property
svn:auto-propsinstead oftsvn:autopropssince this has the very same functionality but works with all svn clients and is not specific to TortoiseSVN.In the Commit dialog you have the option to paste in the list of changed files, including the status of each file (added, modified, etc).
tsvn:logfilelistenglishdefines whether the file status is inserted in English or in the localized language. If the property is not set, the default istrue.TortoiseSVN can use a spell checker. On Windows 10, the spell checker of the OS is used. On earlier Windows versions, it can use spell checker modules which are also used by OpenOffice and Mozilla. If you have those installed this property will determine which spell checker to use, i.e. in which language the log messages for your project should be written.
tsvn:projectlanguagesets the language module the spell checking engine should use when you enter a log message. You can find the values for your language on this page: MSDN: Language Identifiers .You can enter this value in decimal, or in hexadecimal if prefixed with
0x. For example English (US) can be entered as0x0409or1033.The property
tsvn:logsummaryis used to extract a portion of the log message which is then shown in the log dialog as the log message summary.The value of the
tsvn:logsummaryproperty must be set to a one line regex string which contains one regex group. Whatever matches that group is used as the summary.An example:
\[SUMMARY\]:\s+(.*)Will catch everything after “[SUMMARY]” in the log message and use that as the summary.The property
tsvn:logrevregexdefines a regular expression which matches references to revisions in a log message. This is used in the log dialog to turn such references into links which when clicked will either scroll to that revision (if the revision is already shown in the log dialog, or if it's available from the log cache) or open a new log dialog showing that revision.The regular expression must match the whole reference, not just the revision number. The revision number is extracted from the matched reference string automatically.
If this property is not set, a default regular expression is used to link revision references.
There are several properties available to configure client-side hook scripts. Each property is for one specific hook script type.
The available properties/hook-scripts are
- tsvn:startcommithook
- tsvn:precommithook
- tsvn:postcommithook
- tsvn:startupdatehook
- tsvn:preupdatehook
- tsvn:postupdatehook
- tsvn:prelockhook
- tsvn:postlockhook
The parameters are the same as if you would configure the hook scripts in the settings dialog. See the section called “Client Side Hook Scripts” for the details.
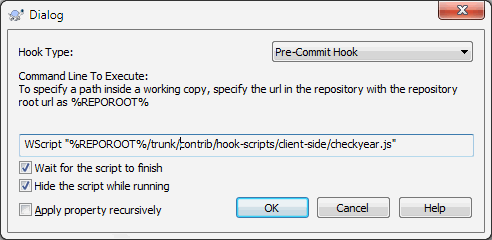
Since not every user has his or her working copy checked out at the same location with the same name, you can configure a script/tool to execute that resides in your working copy by specifying the URL in the repository instead, using
%REPOROOT%as the part of the URL to the repository root. For example, if your hook script is in your working copy undercontrib/hook-scripts/client-side/checkyear.js, you would specify the path to the script as%REPOROOT%/trunk/contrib/hook-scripts/client-side/checkyear.js. This way even if you move your repository to another server you do not have to adjust the hook script properties.Instead of
%REPOROOT%you can also specify%REPOROOT+%. The+is used to insert any number of folder paths necessary to find the script. This is useful if you want to specify your script so that if you create a branch the script is still found even though the url of the working copy is now different. Using the example above, you would specify the path to the script as%REPOROOT+%/contrib/hook-scripts/client-side/checkyear.js.The following screenshot shows how the script to check for current copyright years in source file headers is configured for TortoiseSVN.
When you want to add a new property, you can either pick one from the list in the combo box, or you can enter any property name you like. If your project uses some custom properties, and you want those properties to appear in the list in the combo box (to avoid typos when you enter a property name), you can create a list of your custom properties using
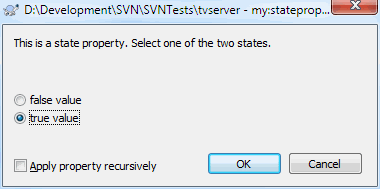
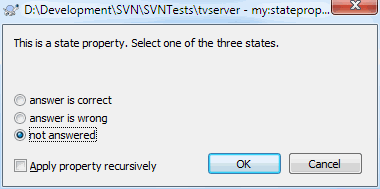
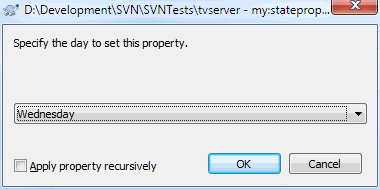
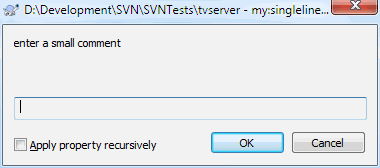
tsvn:userfilepropertiesandtsvn:userdirproperties. Apply these properties to a folder. When you go to edit the properties of any child item, your custom properties will appear in the list of pre-defined property names.You can also specify whether a custom dialog is used to add/edit your property. TortoiseSVN offers four different dialog, depending on the type of your property.
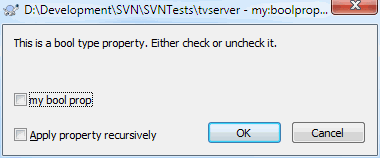
- bool
If your property can only have two states, e.g., true and false, then you can configure your property as a
booltype.
Specify your property like this:propertyname=bool;labeltext(YESVALUE;NOVALUE;Checkboxtext)the
labeltextis the text shown in the dialog above the checkbox where you can explain the purpose and use of the property. The other parameters should be self explanatory.- state
If your property represents one of many possible states, e.g.,
yes, no, maybe, then you can configure your property as astate
property like this:propertyname=state;labeltext(DEFVAL;VAL1;TEXT1;VAL2;TEXT2;VAL3;TEXT3;...)The parameters are the same as for the
boolproperty, withDEFVALbeing the default value to be used if the property isn't set yet or has a value that's not configured.For up to three different values, the dialog shows up to three radio buttons. If there are more values configured, it uses a combo box from where the user can select the required state.
- singleline
For properties that consist of one line of text, use the
singlelineproperty type:
propertyname=singleline;labeltext(regex)the
regexspecifies a regular expression which is used to validate (match) the text the user entered. If the text does not match the regex, then the user is shown an error and the property isn't set.- multiline
For properties that consist of multiple lines of text, use the
multilineproperty type:
propertyname=multiline;labeltext(regex)the
regexspecifies a regular expression which is used to validate (match) the text the user entered. Don't forget to include the newline (\n) character in the regex!
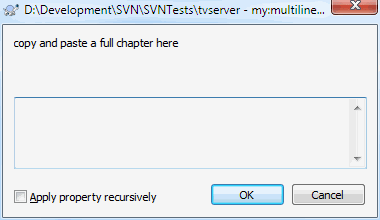
The screenshots above were made with the following
tsvn:userdirproperties:my:boolprop=bool;This is a bool type property. Either check or uncheck it.(true;false;my bool prop) my:stateprop1=state;This is a state property. Select one of the two states.(true;true;true value;false;false value) my:stateprop2=state;This is a state property. Select one of the three states.(maybe;true;answer is correct;false;answer is wrong;maybe;not answered) my:stateprop3=state;Specify the day to set this property.(1;1;Monday;2;Tuesday;3;Wednesday;4;Thursday;5;Friday;6;Saturday;7;Sunday) my:singlelineprop=singleline;enter a small comment(.*) my:multilineprop=multiline;copy and paste a full chapter here(.*)
TortoiseSVN can integrate with some bug tracking tools. This uses
project properties that start with bugtraq:.
Read the section called “Integration with Bug Tracking Systems / Issue Trackers” for further information.
It can also integrate with some web-based repository browsers,
using project properties that start with webviewer:.
Read the section called “Integration with Web-based Repository Viewers” for further information.
Set the project properties on folders
These special project properties must be set on
folders for the system to work.
When you use a TortoiseSVN command which uses these properties, the
properties are read from the folder you clicked on.
If the properties are not found there, TortoiseSVN will search upwards
through the folder tree to find them until it comes to an unversioned
folder, or the tree root (e.g. C:\) is found.
If you can be sure that each user checks out only from e.g
trunk/ and not some sub-folder, then it is
sufficient to set the properties on trunk/.
If you can't be sure, you should set the properties recursively on
each sub-folder.
If you set the same property but you use different values at different
depths in your project hierarchy then you will get different results
depending on where you click in the folder structure.
For project properties only,
i.e. tsvn:, bugtraq:
and webviewer:
you can use the Recursive checkbox to set
the property to all sub-folders in the hierarchy, without also
setting it on all files.
When you add new sub-folders to a working copy using TortoiseSVN, any project properties present in the parent folder will automatically be added to the new child folder too.
Limitations Using the Repository Browser
Fetching properties remotely is a slow operation, so some of the features described above will not work in the repository browser as they do in a working copy.
When you add a property using the repo browser, only the standard
svn:properties are offered in the pre-defined list. Any other property name must be entered manually.Properties cannot be set or deleted recursively using the repo browser.
Project properties will not be propagated automatically when a child folder is added using the repo browser.
tsvn:autopropswill not set properties on files which are added using the repo browser.
Caution
Although TortoiseSVN's project properties are extremely useful, they only work with TortoiseSVN, and some will only work in newer versions of TortoiseSVN. If people working on your project use a variety of Subversion clients, or possibly have old versions of TortoiseSVN, you may want to use repository hooks to enforce project policies. project properties can only help to implement a policy, they cannot enforce it.
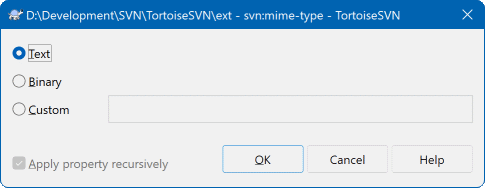
Some properties have to use specific values, or be formatted in a specific way in order to be used for automation. To help get the formatting correct, TortoiseSVN presents edit dialogs for some particular properties which show the possible values or break the property into its individual components.
The svn:externals property can be used to
pull in other projects from the same repository or a completely
different repository as described in
the section called “External Items”.
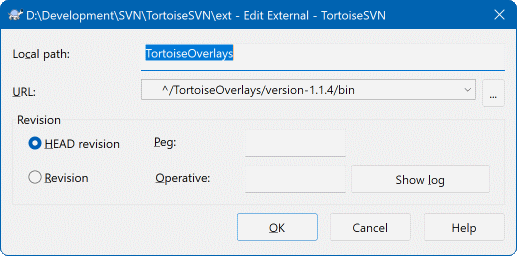
You need to define the name of the sub-folder that the external folder is checked out as, and the Subversion URL of the external item. You can check out an external at its HEAD revision, so when the external item changes in the repository, your working copy will receive those changes on update. However, if you want the external to reference a particular stable point then you can specify the specific revision to use. IN this case you may also want to specify the same revision as a peg revision. If the external item is renamed at some point in the future then Subversion will not be able to update this item in your working copy. By specifying a peg revision you tell Subversion to look for an item that had that name at the peg revision rather than at HEAD.
The button fetches the HEAD revision of every external URL and shows that HEAD revision in the rightmost column. After the HEAD revision is known, a simple right click on an external gives you the command to peg the selected externals to their explicit HEAD revision. In case the HEAD revision is not known yet, the right click command will fetch the HEAD revision first.
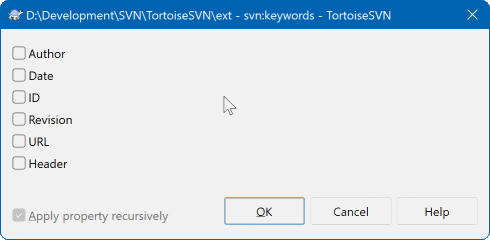
Select the keywords that you would like to be expanded in your file.
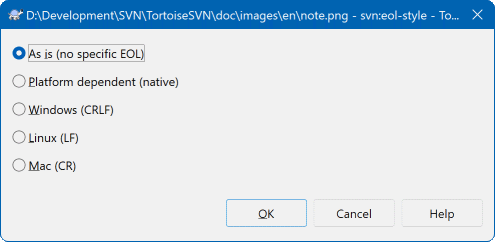
Select the end-of-line style that you wish to use and TortoiseSVN will
use the correct property value.
These 3 properties control the formatting of log messages.
The first 2 disable the in the
commit or lock dialogs until the message meets the minimum length.
The border position shows a marker at the given column width as
a guide for projects which have width limits on their log messages.
Setting a value to zero will delete the property.
Choose the language to use for spell-checking log messages in the
commit dialog. The file lists checkbox comes into effect when you
right click in the log message pane and select
Paste file list. By default the Subversion
status will be shown in your local language. When this box is checked
the status is always given in English, for projects which require
English-only log messages.
This property simply controls whether a file will be checked out as
read-only if there is no lock held for it in the working copy.
This property controls whether a file will be given executable status
when checked out on a Unix/Linux system. It has no effect on a Windows
checkout.
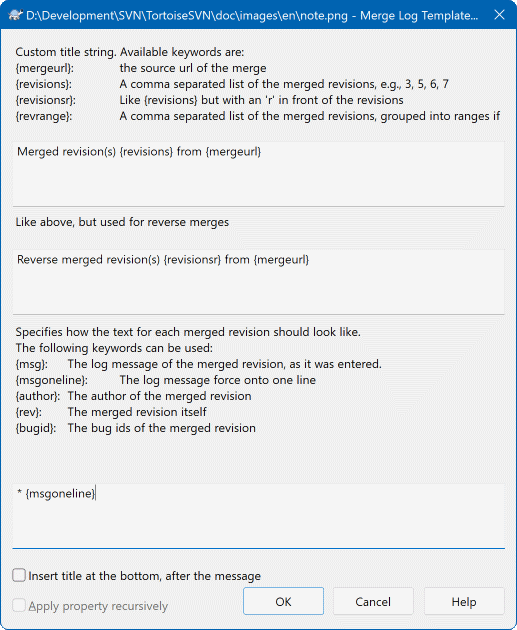
Whenever revisions are merged into a working copy, TortoiseSVN generates a log message from all the merged revisions. Those are then available from the button in the commit dialog.
You can customize that generated message with the following properties:
- tsvn:mergelogtemplatetitle, tsvn:mergelogtemplatereversetitle
This property specifies the first part of the generated log message. The following keywords can be used:
- {revisions}
A comma separated list of the merged revisions, e.g.,
3, 5, 6, 7- {revisionsr}
Like
{revisions}, but with each revision preceded with anr, e.g.,r3, r5, r6, r7- {revrange}
A comma separated list of the merged revisions, grouped into ranges if possible, e.g.,
3, 5-7- {mergeurl}
The source URL of the merge, i.e., where the revisions are merged from.
The default value for this string is
Merged revision(s) {revrange} from {mergeurl}:with a newline at the end.- tsvn:mergelogtemplatemsg
This property specifies how the text for each merged revision should look like. The following keywords can be used:
- {msg}
The log message of the merged revision, as it was entered.
- {msgoneline}
Like
{msg}, but all newlines are replaced with a space, so that the whole log message appears on one single line.- {author}
The author of the merged revision.
- {rev}
The merged revision itself.
- {bugids}
The bug IDs of the merged revision, if there are any.
- tsvn:mergelogtemplatemsgtitlebottom
This property specifies the position of the title string specified with the
tsvn:mergelogtemplatetitleortsvn:mergelogtemplatereversetitle. If the property is set toyesortrue, then the title string is appended at the bottom instead of the top.
Important
This only works if the merged revisions are already in the log cache. If you have disabled the log cache or not shown the log first before the merge, the generated message won't contain any information about the merged revisions.
